
Invitation to a company party: Templates & text blocks for every occasion

Anna Fredholm
June 19, 2026
•
4
min

Learn how to correctly set up the key configurations for your event – from title and location to images and online options.
In the Event Information section, you set all the overarching configurations for your event. This includes the title, location, layout, and images. These details determine how your event appears on the event website, in e-tickets, and in booking confirmations.
The event title appears in several places:
💡Tip: Choose a concise title that clearly communicates the event’s content and target audience.
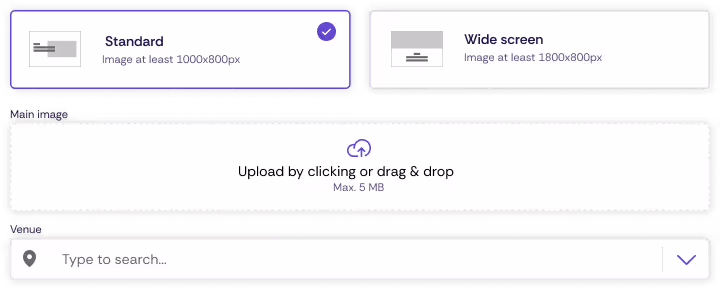
You can choose between two layouts for the event website:
The layout affects how content and images are displayed on the event website.
The main image is displayed as the header on the event website.
Recommended size:
👉 Note: For more information on image formats and optimisation, see the article on images.
In the venue field, you can either:
For online events, a venue is not required.
💡Tip: Oniva allows you to set venues flexibly across different levels, such as in the event information, individual booking options, or for specific sessions. For example, a VIP reception might take place at a different venue than the main event.
Best practice: If all options take place at the same venue, entering it once in the event information is sufficient.
Here you can select organisations that will appear as organisers on the event website.
Contact persons are displayed on the event website as points of contact for guests.
💡Tip: Contact persons do not automatically receive admin rights. Anyone who needs to edit the event must be added as an admin in the event settings. For more information, see the article on account roles and permissions.
Categories help you organise and filter your event internally.
The event description appears on the event website and in the calendar file.
💡 Tip: Keep the description clear, engaging, and informative so guests immediately understand what the event is about.
Mark an event as virtual to either:
💡Tip: You can mark the entire event as online or define only specific booking options as online. If the event is fully virtual, activate the “Online Event” option in the event information. For hybrid events or when only certain sessions are online, you can selectively mark individual booking options as online. This allows flexible combinations of in-person and online participation. More information can be found in the article on virtual events.
With additional content, you can add extra elements to the event website, such as:
💡Tip: Use additional content to provide guests with useful information and highlight important event details.
Yes. In the 'Venue' field under Event Information, you can either select a predefined location from the list or search for a new location via Google Maps. No location entry is required for online events. The location data is also used for the calendar file.
The event title appears on the event website, in the calendar file of the booking confirmation, on the e-ticket, and in notifications such as booking confirmations. Choose a concise title that clearly communicates the content and target audience of the event.
Discover exciting articles about creating unforgettable events.

