Articles by topic

Online Events & Live Streaming

Related articles

Keine Artikel verfügbar.

Table of contents

Last updated:
January 14, 2026

Account groups

Account groups allow you to group accounts together. These groups can then be used to control access to internal events or to import accounts into contact lists. Learn here how to manage your organisation’s account groups.

Illustration showing several portrait photos of people grouped by dashed purple circles. The groups are labelled “Management”, “Marketing department” and “Freelancers”. Each group contains multiple portraits; some circles overlap, indicating possible collaboration or membership in multiple groups. Black background, with a focus on team and organisational structure.

Managing internal events using account groups

With account groups, you can create targeted internal audiences for your events. For example, you can reuse the same audience for recurring events or restrict access to specific departments. External events, on the other hand, are managed via the registration and access settings in the authorisation groups.

Within an event, account groups can be used for the following purposes:

  • Import contacts and send invitations: Import the accounts of an account group directly as contacts into your event and send invitations to them.
  • Restrict access to the event: Under Authorisation groups → Allow access to event website only for selected account groups, you can assign an account group. Only users belonging to this group will have access to the event. This is particularly useful if your event is listed in a library and no invitations are sent actively.


Editing account groups

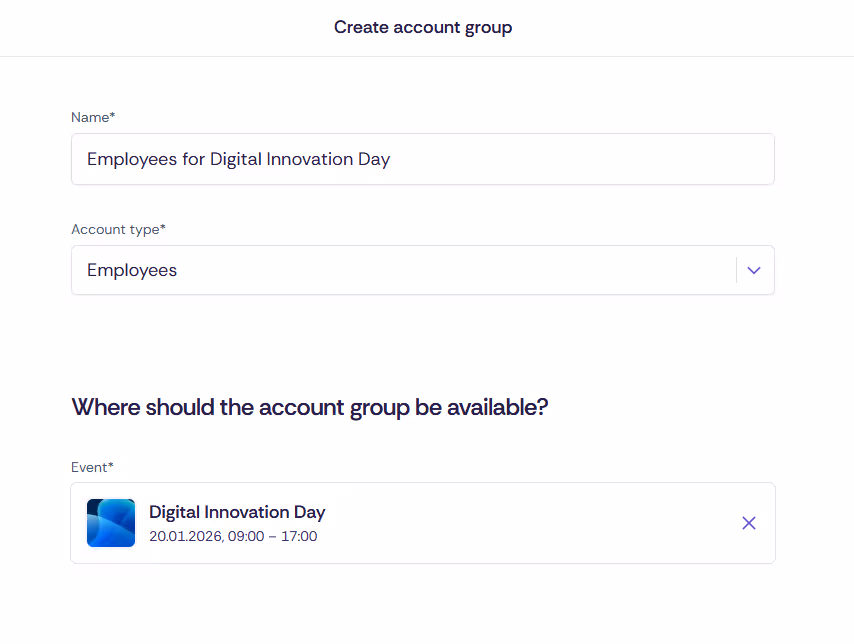
Account groups can be managed in the admin area by admins at all levels. However, event admins can only create account groups for the events for which they are assigned as admins. Workspace and tenant admins, by contrast, can create generally applicable account groups—such as departments—for their workspace or tenant. These groups can then be used by event admins within their events.

Creating new account groups

Below you will learn how to create account groups for your event.

  1. Select “Account groups” in the top navigation bar
  2. Create a new account group using the button
  3. Select the level (if available):
    • Event: For account groups that should only be used within a specific event
    • Workspace: For account groups that should be available across all events within a workspace (e.g. members, departments)
    • Kampagnen: For account groups used within a specific campaign (e.g. HR newsletters, departmental updates)
    • Tenant: For account groups that can be used across the entire tenant (e.g. fixed departments).
Create account group.

Adding or removing accounts from an account group

  1. Select “Edit accounts” from the action menu (···).
  2. Add or remove accounts using their email addresses.

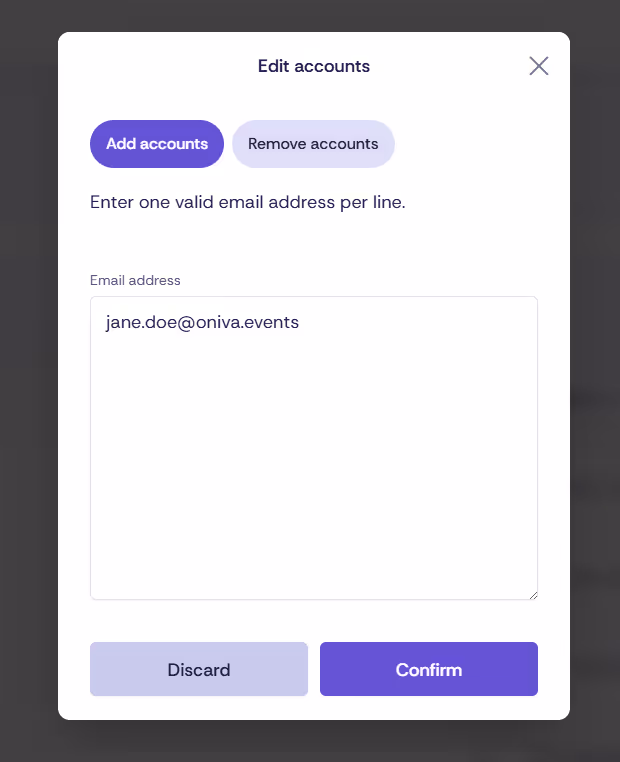
After a few minutes, you will receive a notification at your email address confirming the success of the import. It will list all email addresses that could not be imported into the account group—for example, because the account does not exist or an incorrect account type was selected.

Screenshot showing the option to edit accounts.
Screenshot showing the entry of account data for managing account groups.


Importing contacts from accounts

For events with internal audiences, contacts can be imported directly from account groups. To do this, at least one authorisation group must be created that is restricted to accounts.

Importing contacts from accounts in Oniva.


Restricting an event to accounts

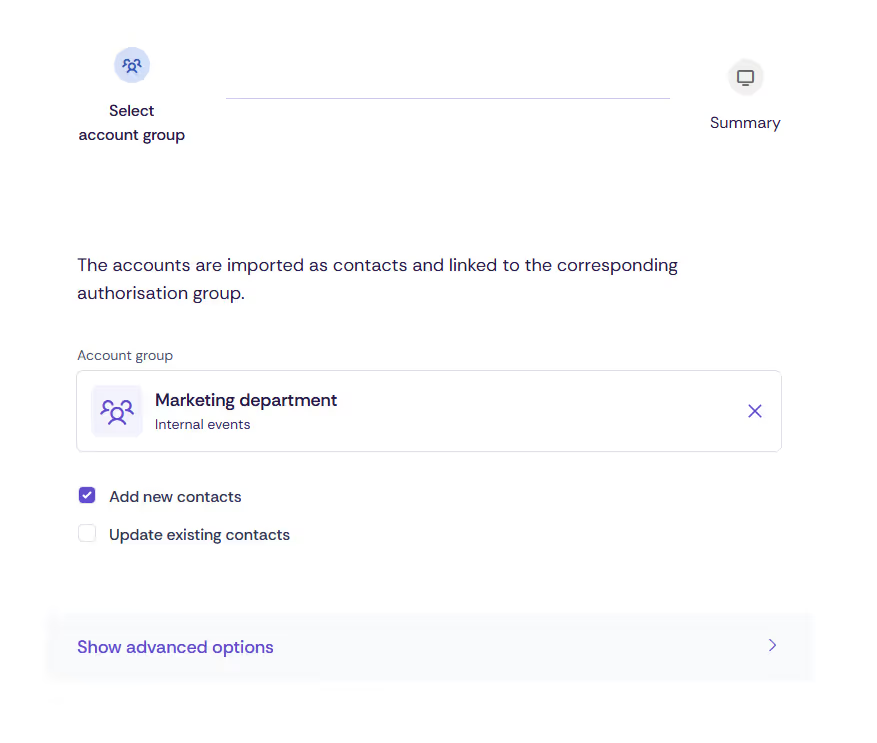
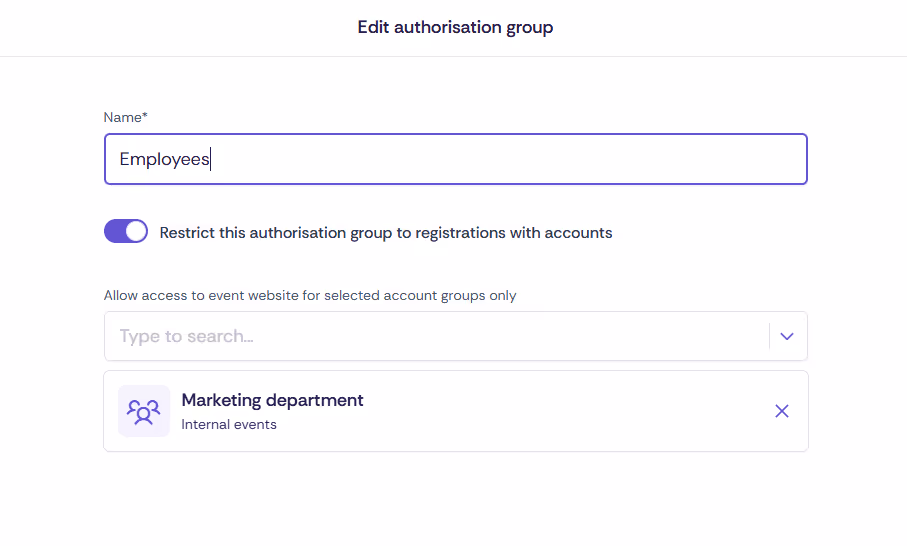
To restrict an internal event to specific accounts, the relevant account group can be assigned within the authorisation group. If no account group is assigned, all accounts of the selected account type will be able to register.

Restricting events to account groups in Oniva.
Download

By submitting, I agree that Oniva may process and store my data in accordance with the Oniva
Privacy Policy
.

Was this article helpful?

Thank you very much! Your feedback has been recorded.
Huch! Beim Absenden des Formulars ist etwas schief gelaufen.

Helpful information for event managers

Discover exciting articles about creating unforgettable events.

Didn't find an answer?

If you couldn't find the information you were looking for, our support team is happy to help. Create a ticket, and we will get back to you as soon as possible.
Time icon
Support hours
Monday to Friday, 08:00 to 17:00(excluding public holidays in the city of Zurich)

Contact support

Your contact details

Only requests from existing admins will be processed. Please enter your own contact details in the section below.

Request details

Please provide all information regarding your request. The more detailed your input, the faster we can process it.

Insert the link to your event or campaign – this helps us locate it more quickly.
Describe your issue as precisely as possible: What exactly do you need help with? Which function or area of the application is affected? If something didn’t work as expected, what happened and what steps did you take beforehand?

⚠️ Please do not provide
any personal data of guests
(e.g. names, e-mail addresses or phone numbers). Use
booking numbers
and
links
only to describe your request. Note: If you enter personal data, it will be transmitted to and
processed by our external support provider
 as part of handling your request.

By submitting, I agree that Oniva may process and store my data in accordance with the Oniva Privacy Policy.

Thank you for your support request! 🎉

What happens next?

A member of our support team will contact you as soon as possible to help you with your issue. In the meantime, visit our knowledge base and explore helpful articles and guides that may already provide the answers you need.

Refunds

Your contact details

Only requests from existing admins will be processed. Please enter your own contact details in the section below.

Request details

⚠️ Please do not provide
any personal data of guests
(e.g. names, e-mail addresses or phone numbers). Use
booking numbers
and
links
only to describe your request. Note: If you enter personal data, it will be transmitted to and
processed by our external support provider
as part of handling your request.

Fees

In addition to the usual processing fees, an extra fee of
CHF 2.50 / EUR 2.40 per transaction
 will be charged for refunds. This amount will be deducted from the total proceeds. For more information, please refer to the
Terms of Use
.

By submitting, I agree that Oniva may process and store my data in accordance with the Oniva Privacy Policy.

Thank you for your support request! 🎉

What happens next?

A member of our support team will contact you as soon as possible to help you with your issue. In the meantime, visit our knowledge base and explore helpful articles and guides that may already provide the answers you need.