HubSpot API
Connect Oniva to HubSpot and manage contacts, registrations and attendance data directly in your CRM without any manual steps in between.
Setting up and using the HubSpot integration
The HubSpot integration connects your HubSpot account bidirectionally with Oniva:
- Import: Import contacts from a HubSpot list directly into your event.
- Export via Marketing Events: Oniva automatically creates your events including contact status in HubSpot and transfers new contacts.
- Export via Custom Object: Oniva transfers personal event links as individual object records to HubSpot, e.g. for use in HubSpot emails or workflows.
Prerequisites
- The paid HubSpot API add-on must be enabled for your workspace. Contact Oniva Support or your Customer Success Manager to have it activated.
- To create a private app in HubSpot, you need tenant admin permissions.
- Exporting personal event links via Custom Objects requires a HubSpot Enterprise subscription, as Custom Objects are only available in Enterprise accounts. Contact import and Marketing Events export are also supported on lower-tier plans, provided that Private Apps are available.
Step 1: Create an access token in HubSpot
- Click the gear icon (Settings) in the top navigation bar.
- In the left sidebar, navigate to Integrations → Private Apps.
- Click on an existing app or create a new one with "Create a private app". Give the app a descriptive name (e.g. "Oniva Integration").
⚠️ Note: In HubSpot, Private Apps may sometimes be labeled as "Legacy App" or "Old App". They can still be used for the integration with Oniva. - Switch to the "Scopes" tab and enable permissions according to your use case (see table below).
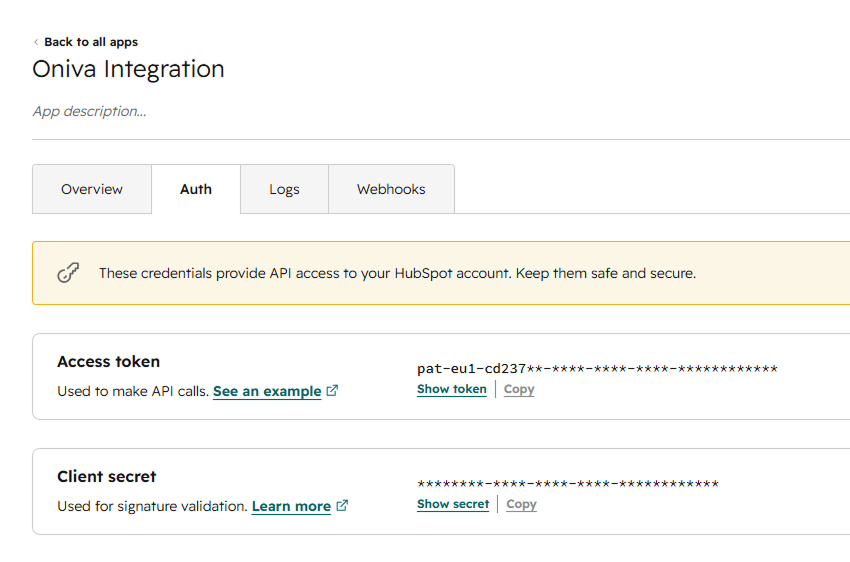
- Save the app and switch to the "Auth" tab.
- Click "Show token" and then "Copy".
- Paste the access token into Oniva under App connections (see Step 2).
Required scopes
Enable at minimum the scopes that match the features you are using. Only activate the permissions you actually need.
For importing contacts from HubSpot into Oniva:
crm.lists.readcrm.schemas.contacts.readcrm.objects.contacts.read
Additionally for exporting event data from Oniva (Marketing Events):
crm.objects.contacts.writecrm.objects.marketing_events.readcrm.objects.marketing_events.write
Additionally for exporting personal event links (Custom Object, HubSpot Enterprise only):
crm.schemas.custom.readcrm.objects.custom.readcrm.objects.custom.write
👉 Note: Missing scopes can be added to an existing app at any time without creating a new one.
Static vs. rotating token
HubSpot offers both options. For a stable, uninterrupted connection, we recommend a static token. It does not expire and does not need to be renewed. If you use a rotating token for security reasons, remember to update the token in Oniva immediately after each rotation – otherwise the connection will be interrupted.
Step 2: Connect HubSpot in Oniva
- Navigate to the account overview in Oniva and select "App connections".
- Select HubSpot from the list and paste the copied access token.
- Choose whether HubSpot should be used for contact import only, or also for exporting event data. Two export functions are available, which can be activated individually:
- Marketing Events sync – Creates events including contact status in HubSpot and transfers new contacts.
- Custom Objects – Enables the transfer of personal event links to HubSpot.
- Confirm the connection.
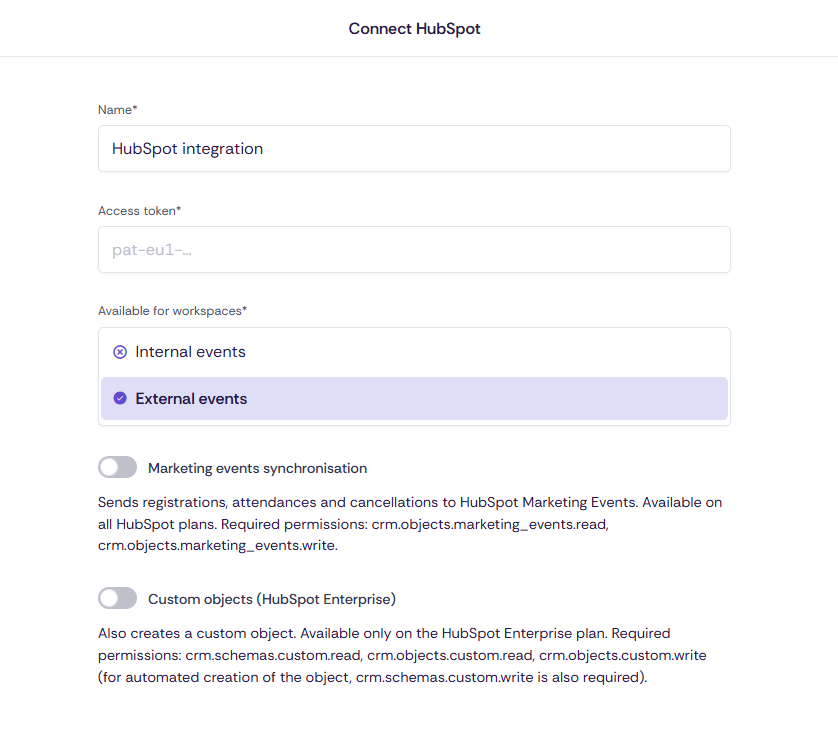
⚠️ Important: The functions selected here must be covered by the corresponding scopes of your access token (see Step 1). If you activate Custom Objects without having granted the custom object scopes, the transfer will fail.
Step 3: Activate the app connection on workspace and event level
The connection must also be enabled at workspace and event level.
- Open the settings of the desired workspace and go to "App connection" → "Activate".
- Open the desired event and go to "App connection" → "Activate" as well.
Once activated, HubSpot contacts will be available for contact import within the event. If Marketing Events sync has also been activated, event data will be automatically transferred to HubSpot from this point onwards (see "Export" section).
Import: Adding contacts from HubSpot to an event
Once the app connection is activated at event level, you can import contacts from a HubSpot list directly.
- Navigate to "Contacts" in the event dashboard.
- Select "Import contacts".
- Choose the desired HubSpot list.
- Select "Create new contacts" as the import mode.
- Map the fields from HubSpot to the corresponding fields in Oniva.
- Click "Import contacts" to complete the import.
Syncing contacts added after the initial import
HubSpot contacts are not automatically kept up to date in Oniva. If further contacts have been added to the HubSpot list during the event, or existing contacts have been updated, the import must be repeated manually.
- Navigate to "Contacts" in the event dashboard.
- Select "Import contacts".
- Choose the desired HubSpot list (see segments within HubSpot).
- Select "Add new contacts or update existing contacts" as the import mode.
- Map the fields from HubSpot to the corresponding fields in Oniva.
- Click "Import contacts" to complete the sync.
👉 Note: This process can be repeated at any time without duplicating existing contacts. Existing contacts will be updated; new contacts will be added.
Import: Creating HubSpot contacts as accounts in Oniva
In addition to contact import at event level, you can also create HubSpot contacts as accounts (user accounts) in Oniva. This is useful for granting people access to Oniva.
- Select "Accounts" via the gear icon.
- Select "Import accounts".
- Select HubSpot as the source.
- Choose the desired HubSpot list (see segments within HubSpot).
- Select the account type if multiple are available (e.g. SSO).
- Select "Add new accounts or update existing ones".
- Map the fields from HubSpot to the corresponding fields in Oniva.
- Select "Start import".
After the import, the accounts are available in Oniva. Using "Select all" and the "Activate accounts" action, all users will receive an activation email to set up their account.
Export: Transferring event data to HubSpot via Marketing Events
If Marketing Events sync is activated (Step 2) and the app connection is enabled at workspace and event level (Step 3), Oniva transfers event data to HubSpot automatically. No manual export is required.
What is transferred?
- One HubSpot Marketing Event is created per Oniva event. An Oniva event cannot be mapped to multiple HubSpot Marketing Events (1:1 relationship).
- The contact status (e.g. registered, confirmed, declined, attended) is recorded on the Marketing Event for each participant.
- Contacts that do not yet exist in HubSpot are created as new contacts.
When is data transferred?
The transfer happens automatically as soon as a booking is created in Oniva or a participant's status changes. Unlike the import (manual), Marketing Events sync is a continuous, event-driven process.
How to check the result in HubSpot:
- In HubSpot, open the Marketing → Marketing Events menu (or the corresponding object overview).
- Search for the event by name and open the record.
- Under the associated contacts, you will see the transferred participants with their status.
💡 Tip: Customize the HubSpot contact view
For a clearer overview of a contact's event participation, we recommend displaying Marketing Events as a card on the right-hand side of the contact record.
You can customize the default contact record layout in HubSpot by navigating to Settings (gear icon in the top right) → Data Management → Record Customization. There, you can configure the contact record view to display the Marketing Events card.
Export: Transferring personal event links via Custom Object
Personal event links (individual participation links per contact) are transferred via a HubSpot Custom Object. This allows them to be reused in HubSpot, for example as a personalised link in marketing emails or as a trigger in workflows.
Prerequisites
- HubSpot Enterprise plan (custom objects are only available in Enterprise accounts).
- Custom object scopes in the access token (see Step 1).
- Custom Objects function activated in the Oniva app connection (Step 2).
Process
- Make sure the prerequisites above are met.
- Once personal links are generated in an event, Oniva transfers them as Custom Object records to HubSpot and associates them with the relevant contact. Only the personal link is transferred – no additional fields.
- In HubSpot, you will find the transferred records under Contacts → Custom Objects, or directly on the contact record under the associated objects.
💡 Tip: Using the linked personal event link, you can set a personalised call-to-action in HubSpot emails or build workflows based on attendance status.
Troubleshooting
The connection fails
The connection to HubSpot could not be established. Make sure your access token includes the scopes required for your use case (see Step 1). You can check and add these in HubSpot under Settings → Integrations → Private Apps → your app → Scopes.
HubSpot is not available as an import source
Make sure the app connection is activated at both workspace and event level (Step 3).
HubSpot does not appear as a source in account import
Account import uses the same HubSpot connection as contact import. Make sure HubSpot is connected at account level with a valid access token (Step 2) and that the token includes the read scopes crm.lists.read, crm.objects.contacts.read and crm.schemas.contacts.read.
Event data is not being transferred to HubSpot
Check whether Marketing Events sync is activated in the app connection (Step 2) and whether the access token includes the scopes crm.objects.marketing_events.read, crm.objects.marketing_events.write and crm.objects.contacts.write. Transfers only occur from new bookings or status changes onwards – participants recorded before activation are not transferred retroactively.
Personal event links are not appearing in HubSpot
Custom Objects require a HubSpot Enterprise plan. Also check whether the Custom Objects function is activated and whether the token includes the custom object scopes (crm.schemas.custom.*, crm.objects.custom.*).
The connection was working but suddenly stopped
If you are using a rotating token, it has most likely been rotated. Update the token in Oniva under App connections. For an uninterrupted connection, we recommend using a static token.